menu_bookTable of Contentsexpand_more
Introduction
This article gives an explanation about to generate metatags dynamically in asp.net web forms. In this article, you'll also learn how to add metatags in asp.net webforms (.aspx) form using c# and how to get web form name from the URL as well as brief information about how to get value for meta tags and title tag from SQL server database and add into web forms dynamically. Here, we will also learn how to retrieve values from the SQL server database as well as the use of data table in C#.
Basically, a metatag plays a key role to improve search engine optimization(SEO) ranking for the website. There are many metatags are available but few of them is very important such as meta keywords, meta description, and many other for search engine indexing and improving the ranking of your website over the search engines like google, bing and etc. The contents and information that you provide in the meta tag are used by the search engines like Google, Bing and etc to indexing your web form. So, if someone searching relevant information that you provided into your metatags then search engine suggests and shows your web page to the users as a search result who searching kind of information.
While you working with asp.net web forms applications you should write a proper metatag for your website if you want to improve the SEO ranking of your asp.net web application. I noticed many of the developers working with asp.net web forms applications they manage titles and metatags for each and every aspx web page manually. So, in this article, I will explain how you can generate and add metatags and titles for each of your aspx web pages dynamically.
Requirement
(1) What is Metatags?
(2) How to generate metatags dynamically in ASP.NET web forms? Explain with Example.
What is Metatags?
A meta tag is an HTML (Hypertext Markup Language) tag, that is used in HTML and XHTML to provide structured contents of a web page. It is part of the head section so you must need to write your metatags between head tags. You can use multiple metatags with different attributes on the same web page.
Generate Metatag Dynamically in ASP.NET Webforms
Let,s take an example to generate metatag dynamically in asp.net web forms so, we can get more idea about it.
Step 1: First, you have to open your visual studio and go to the file menu and select New >> Website.
Step 2: Now, you can see one popup window will appear on the screen and you have to select the language of your web application like C# or VB.net from the left menu as well as select ASP.NET Empty Website and then you just have to select folder path where you want to save your web application project and then click on OK button.
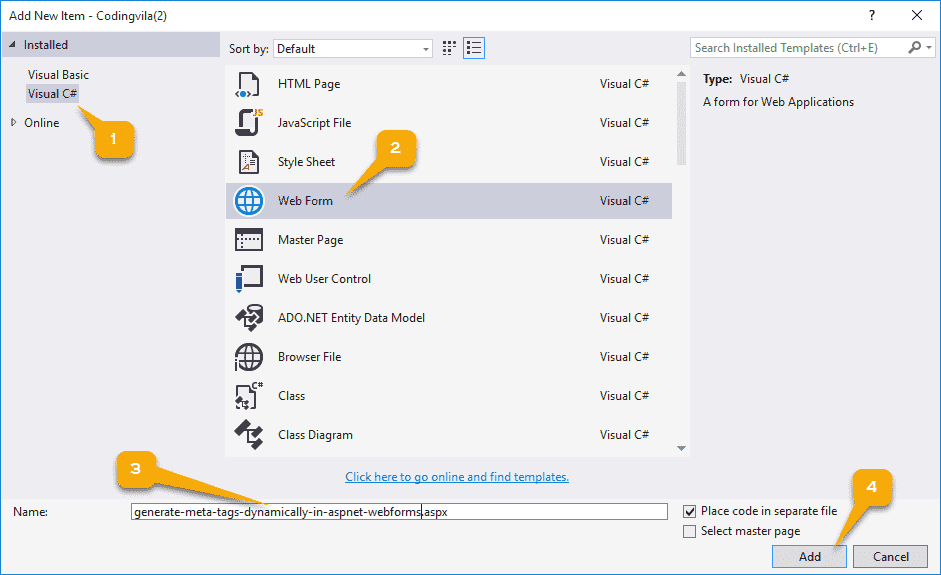
Step 3: Now, add new aspx web form into your directory as I showed in the screen below.
Step 4: Now, you have to write following HTML code in your aspx form as I showed below, you can design and manage the following code as per your need.
ASPX CODE
<%@ Page Language="C#" AutoEventWireup="true" CodeFile="generate-meta-tags-dynamically-in-aspnet-webforms.aspx.cs" Inherits="articles_2019_06_generate_meta_tags_dynamically_in_aspnet_webforms" %>

<!DOCTYPE html>

<html xmlns="http://www.w3.org/1999/xhtml">
<head runat="server">
    <title></title>
</head>
<body>
    <form id="form1" runat="server">
    <div>
        <center>
            <h1>Welcome to Codingvila</h1>
            <p>Hi, This is Nikunj Satasita, The Technical Author of Codingvila.</p>
        </center>

    </div>
    </form>
</body>
</html>
Step 5: Now, you need a SQL server database to retrieve data for metatags from the SQL server database and based on that data we will add metatags into our aspx web form. So, connect your SQL server database and create a sample table with some dummy records for demonstration.
CREATE TABLE
CREATE TABLE [dbo].[tbl_Webforms] (
    [FormId]          INT             IDENTITY (1, 1) NOT NULL,
    [UserId]          INT             NULL,
    [FormTitle]       NVARCHAR (50)   NULL,
    [FormName]        NVARCHAR (100)  NULL,
    [Metaviewport]    NVARCHAR (50)   NULL,
    [Metakeywords]    NVARCHAR (1000) NULL,
    [Metadescription] NVARCHAR (1000) NULL,
    [Metalanguage]    NVARCHAR (10)   NULL,
    [Metaauthor]      NVARCHAR (20)   NULL,
    [Metagenerator]   NVARCHAR (10)   NULL,
    [EntryDate]       DATETIME        NULL,
    CONSTRAINT [PK_tbl_Webforms] PRIMARY KEY CLUSTERED ([FormId] ASC)
);
INSERT RECORD
INSERT INTO tbl_Webforms
(UserId,
FormTitle,
FormName,
Metaviewport,
Metakeywords,
Metadescription,
Metalanguage,
Metaauthor,
Metagenerator,
EntryDate) VALUES (
2
,'Generate Meta Tags Dynamically in ASP.NET Webforms'
,'generate-meta-tags-dynamically-in-aspnet-webforms.aspx'
,'width=device-width, initial-scale=1'
,'Codingvila, Nikunj Satasiya, blogs, MVC, C#.Net, source code, Code Snippets, Csharp, Free download,  in ASP.NET, MVC, C#, VB.NET, VB, PHP, Android, Java, Python, SQL Server, Delphi, Angular 7, HTML, CSS, JavaScript, JQuery, code, students, free source code, examples, Desktop application, asp.net web forms'
,'Codingvila provides articles on software and web development topics as well as free final year projects in Asp.Net, C#, Vb.Net, SQL Server and etc.'
,'English'
,'Nikunj Satasiya'
,'Codingvila'
,GETDATE())
Step 6: Now, you have to connect your web application with your database server and for that, you need to write a database connection string into your web.config file as I showed below.
Open your Web.config file and add the following code before the <configuration> tag close.
Web.config
  <connectionStrings>
    <add name="ConnectionString" connectionString="Data Source=DESKTOP-P1PHIU6\SQLEXPRESS;Initial Catalog=DB_Codingvila;Integrated Security=True"/>
  </connectionStrings>
Step 7: Now, It's time to start actual code development and write the logic for add metatags dynamically in asp.net master page as well as in the aspx child web forms. but before that, you need to add following namespaces into your code-behind file which is available with .cs file extension into your directory, here in this example our code-behind file is "generate-meta-tags-dynamically-in-aspnet-webforms.aspx.cs"
C# Namespace
using System.Data;
using System.Data.SqlClient;
using System.Web.UI.HtmlControls;
Step 8: After the namespace, you have to generate the method and functions to retrieve the metatags information from the database as well as function for add metatags dynamically.
C# Function to Retrieve Data From Database
private DataTable GetDataForMetadata(string FormName)
    {
        try
        {
            string strQuery = "SELECT FormTitle, Metaviewport, Metakeywords, Metadescription, Metalanguage, Metaauthor, Metagenerator FROM tbl_Webforms WITH (NOLOCK) WHERE LOWER(FormName) = LOWER(@FormName)";
            string strConnectionString = ConfigurationManager.ConnectionStrings["ConnectionString"].ConnectionString;
            using (SqlConnection Connection = new SqlConnection(strConnectionString))
            {
                using (SqlCommand cmd = new SqlCommand(strQuery))
                {
                    using (SqlDataAdapter da = new SqlDataAdapter())
                    {
                        cmd.CommandType = CommandType.Text;
                        cmd.Parameters.AddWithValue("@FormName", FormName);
                        cmd.Connection = Connection;
                        da.SelectCommand = cmd;
                        DataTable dt = new DataTable();
                        da.Fill(dt);
                        return dt;
                    }
                }
            }
        }
        catch (Exception ex)
        {

            throw ex;
        }

    }
Explanation
Here, as you can see in the code above I have stored my SQL query in the local string variable strQuery then get the connection string from the web.config file and stored into strConnectionString. Then created an object of SqlConnection and pass strConnectionString into it as an argument. Then created an object of SqlCommand and pass strQuery into it as an argument. Then I have created an object of SqlDataAdapter and using the Fill method of DataAdapter fill data table and returns the data table as a result set.
C# Function to Add Metatags Dynamically
public void GenerateMeta(string ListofMetaTag, DataTable dtMeta)
    {
        try
        {
            string[] Metalist = ListofMetaTag.Split(',');

            if (Metalist.Length > 0)
            {
                foreach (string strMeta in Metalist)
                {
                    string ColumnName = "Meta" + strMeta.ToLower();
                    if (dtMeta.Columns.Contains(ColumnName))
                    {
                        HtmlMeta objHtmlMeta = new HtmlMeta();
                        objHtmlMeta.HttpEquiv = strMeta;
                        objHtmlMeta.Name = strMeta;
                        objHtmlMeta.Content = dtMeta.Rows[0][ColumnName].ToString();
                        this.Page.Header.Controls.Add(objHtmlMeta);
                        objHtmlMeta = null;
                    }
                }
            }
        }
        catch (Exception ex)
        {
            throw ex;
        }
    }
Explanation
As you can see in the above code I have split ListofMetaTag passed as arguments by the user and stored into the string array "Metalist". now check if the length of Metalist is greater then 0 that means if "Metalist" contains at least one item then an only then we will add metatags into our web forms. Now, with the use of for each loop add metatags one by one into aspx web forms. If you observed then I have generated a column name using static string "Meta" and items comes from the loop "strMeta" like "Meta" + strMeta.ToLower() it's just because of the structure of my database, in my database, there are columns for metatags which is start with "Meta" such as Metaviewport, Metakeywords, Metadescription and etc as you can see in the table columns above.
Then I have created the object of HtmlMeta class which comes from System.Web.UI.HtmlControls namespace and then assign appropriate values to every attribute such as HttpEquiv, Name, Content and etc, and finally add the control into the head section of the page because metatags should be paced into the head section of the webpage using the this.Page.Header.Controls.Add(objHtmlMeta) hear objHtmlMeta is the object of HtmlMeta class. and finally at the end set this object as null.
Step 9: Now, we will write the following code into our code-behind .cs file in the load event of the page, you also can write this code into page_Init event because of page_Init will fire before fire Page_load event. Here I have used Page_load event to add page title and metatags dynamically.
C#
protected void Page_Load(object sender, EventArgs e)
    {
        try
        {
            string FormName = Request.Url.Segments[Request.Url.Segments.Length - 1];
            DataTable dtMetaTags = this.GetDataForMetadata(FormName);
            if (dtMetaTags != null && dtMetaTags.Rows.Count > 0)
            {
                this.Page.Title = dtMetaTags.Rows[0]["FormTitle"].ToString();
                string Meta = "viewport,generator,Author,keywords,description,language";
                GenerateMeta(Meta, dtMetaTags);
            }
        }
        catch (Exception ex)
        {

            throw ex;
        }

    }
Explanation
As you can see in the code here I have retrieved the name of the aspx web form from the URL and store into local string variable which is FormName. Here Request is a system.web.HttpRequest object for the requested page, Url is used to get URL of the requested page and the segments get the string array containing the path segments that make up the specified URI.
As you can see in the above screen our page in the directory "/articles/2019/06/generate-meta-tags-dynamically-in-aspnet-webforms.aspx" and we need an only name of the form to retrieve metatag information from the database server for this webpage. So, here the length of Request.Url.Segments are 5 and we want the last segment from the segment which is available at index 4 so we just subtract 1 from the total length of a segment witch is 5 and we get the 4 as output and we passed that index 4 into segment array something like Request.Url.Segments[Request.Url.Segments.Length - 1] where Request.Url.Segments.Length - 1 = 4 So, Request.Url.Segments[4] and returns the name of the web form.
Then I passed that web form name into GetDataForMetadata function as an argument and return a data table from the database server with metatags information for "generate-meta-tags-dynamically-in-aspnet-webforms.aspx" web form. Then I simply check if the retrieved data table is not null then assign the title of the page and generate a comma separated string for metatags witch I want to add into my web form and stored into a local variable with name "Meta" and passed "Meta" and retrieved data table into GenerateMeta function as a argument.
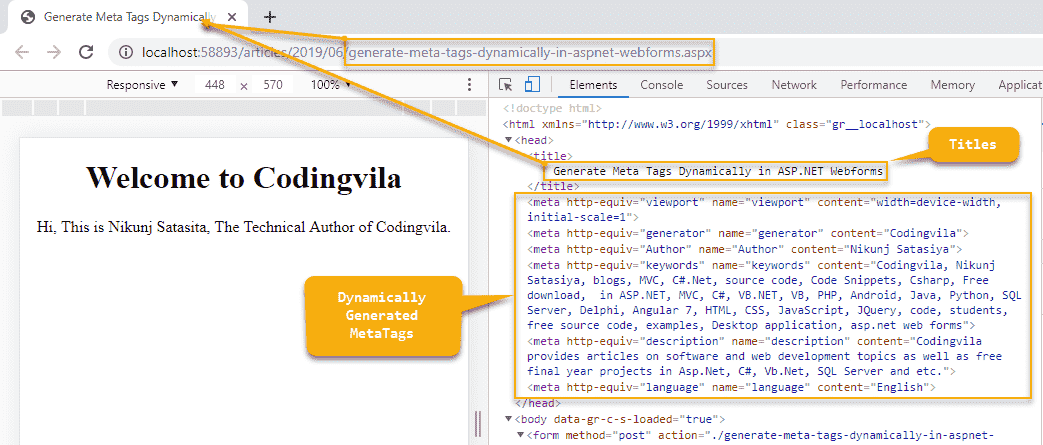
Step 10: now, it's time to run our web application, when our page load successfully in the web browser, go to inspect element, to open inspect you can press (F12) key or you also can use (Ctrl + U) to view source code of the page where you can see the list of meta tags, witch, we passed into GenerateMeta function as well as the title of the page which is assigned dynamically into aspx web page as I showed in the screen below.
Summary
In this article, we learned how to add metatags and page title dynamically in asp.net web forms application as well as how to retrieve data table from the SQL server database using C#.


